
 fastfixoffice@yahoo.com
  Book Appointment
 If your garage door remote has stopped working or you’ve bought a new system and need it set up, you’re in the right place. This guide will walk you through everything you need to know about garage door opener remote installation, from the basic tools you’ll need to troubleshooting common issues. Whether you’re a homeowner doing it yourself or a business owner keeping your property secure, the steps are straightforward once you understand the process.
At Fast Fix Garage Door, we assist customers across the U.S. with professional installation and setup. However, if you prefer to handle it yourself, this guide will help you get started.
What Is Garage Door Opener Remote Installation?
Garage door opener remote installation involves connecting a handheld transmitter (your remote) with the main garage door opener unit. This allows you to open or close your garage with a button, eliminating the need for manual door operation.
Here’s what happens behind the scenes:
- The remote sends a coded radio signal.
- The receiver inside the opener reads that signal.
- When matched, the motor activates and moves the door.
Every modern system uses rolling code technology to keep your garage secure from signal theft.
What Tools Do You Need to Install a Garage Door Opener Remote?
Before you start your garage door remote installation, make sure you have:
- A ladder (for accessing the opener motor)
- The remote and the opener’s manual
- A small screwdriver
- Fresh batteries for the remote
- A flashlight (for dark garages)
Optional but helpful:
- Smartphone (for smart remote setup)
- A notepad to record codes if your opener uses manual programming
Having these ready saves time and prevents you from climbing up and down repeatedly.
How to Install a Garage Door Opener Remote Step by Step
This is the most common question homeowners ask: How do I install a garage door opener remote? Here’s a simple, safe method that works for most major brands like LiftMaster, Chamberlain, and Genie.
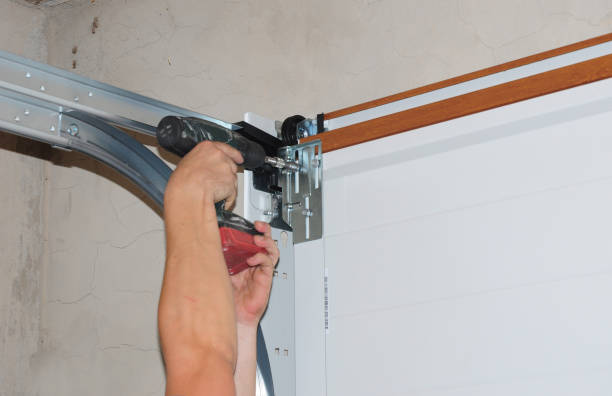
1. Locate the Learn Button
Find the “Learn” or “Program” button on the garage door opener motor unit. It’s usually near the antenna wire or under a light cover.
2. Press the Learn Button
Press it once and release. A light should turn on or blink to show it’s in programming mode.
3. Press the Remote Button
Within 30 seconds, press the main button on your remote. The opener’s light should flash or click once to confirm pairing.
4. Test the Remote
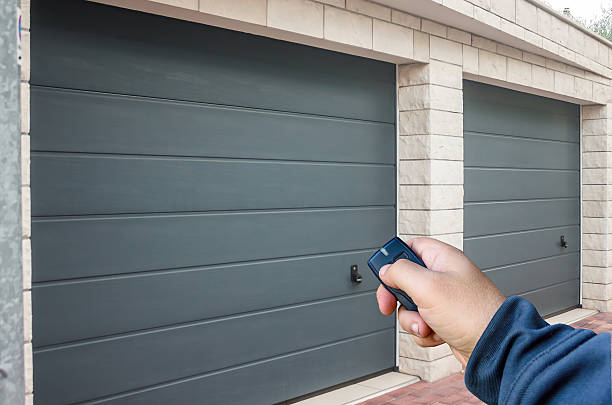
Stand back and press the remote again. If the door opens or closes, your garage door opener remote installation was successful.
5. Repeat for Multiple Remotes
If you have more than one, follow the same process for each.
That’s all it takes for a basic setup.
What If My Garage Door Remote Doesn’t Work After Installation?
Sometimes, installing the garage door opener remote steps go smoothly, but the remote still won’t respond. Here’s how to fix that quickly:
- Check the batteries. Weak or dead batteries are the top cause of remote failure.
- Reprogram the remote. The signal may not have been saved correctly the first time.
- Verify compatibility. If you’re using a universal remote, confirm it supports your brand.
- Inspect the antenna wire. Make sure it’s hanging down and not damaged.
- Reset the opener. Unplug it for 30 seconds and plug it back in to clear minor software glitches.
If none of these solve it, your receiver module might be faulty, something a technician from Fast Fix Garage Door can quickly diagnose.
How to Program a Garage Door Opener Remote (For Smart Models)
If you have a smart garage door system, garage door remote programming happens through an app instead of buttons. Here’s what to do:
- Download your opener’s app (like MyQ or Aladdin Connect).
- Create or log in to your account.
- Follow the in-app instructions to add a new remote or device.
- Name your remote and test it.
The advantage of smart systems is control from anywhere and easy sharing of access with family or employees.
Can You Install a Universal Garage Door Remote?
Yes, and it’s often a great choice. Universal garage door remote installation works across different brands, making it ideal for multi-door garages or if you’ve lost your original remote.
Here’s what you need to know:
- Most universal remotes support major brands made after 1993.
- Set up usually involves selecting your opener’s brand using small switches or codes.
- Follow the included chart or manual for pairing instructions.
If you’re unsure which universal remote fits your opener, check your existing motor’s model number and compare it online before buying.
How Long Does Garage Door Remote Installation Take?
For most homeowners, garage door opener remote installation takes less than 10 minutes per remote. If you’re setting up multiple doors, add another 5–10 minutes for each.
Smart remote setups take slightly longer (around 20–30 minutes) because of app configuration and Wi-Fi pairing.
DIY vs Professional Garage Door Opener Remote Installation
Let’s break this down.
DIY Installation
- Cost-effective if you’re confident with basic tools.
- Works fine for standard or universal remotes.
- Great for single remotes or replacements.
Professional Installation
- Ensures compatibility and security.
- Ideal for complex systems or commercial properties.
- Includes full safety checks and remote syncing.
For businesses or homeowners with multi-door systems, calling a pro like Fast Fix Garage Door saves time and avoids connection errors.
What Are Common Problems After Installation?
Here are the most common issues people face after garage door opener remote installation and what to do about them:
| Problem | Likely Cause | Quick Fix |
| Remote works intermittently | Weak battery or interference | Replace the battery, move other electronics away |
| The door doesn’t respond | Signal not programmed correctly | Reprogram using the Learn button |
| Remote work only up close | Antenna wire is damaged or tucked away | Check and straighten the antenna |
| Multiple remotes not syncing | Limit on memory slots reached | Clear the opener memory and reprogram the remotes |
If issues persist, it might be time for a garage door opener replacement or a receiver module upgrade.
How to Replace or Reprogram an Old Garage Door Remote
If your old remote is lost or outdated, garage door remote replacement is simple. You’ll just need the new remote, the opener’s model number, and a few minutes.
Here’s the process:
- Erase all old codes from the opener by holding the Learn button for 10 seconds.
- Press the Learn button again to enter pairing mode.
- Program the new remote using the steps from earlier.
- Test it to confirm the new code works.
This clears old remotes from memory, helpful for security if one were misplaced.
Final Thoughts:
Setting up your garage door opener remote isn’t complicated once you understand the steps. With the right tools, clear instructions, and a few minutes of patience, anyone can handle it.
Still, if you run into issues, just want to make sure your system is secure, call Fast Fix Garage Door. Their team provides expert help with garage door opener remote installation, troubleshooting, and upgrades, so your garage works reliably every time.